The Manage Accounts area is accessible from the Control Panel menu in the Admin of your reseller portal. There are 5 different views - Sites, Packages, Domains, Statistics and Billing.The Sites view will be shown by default. Here you will see a list of the websites accounts hosted under your reseller private label, with several details about each account: creation date, login date, last upgrade applied, expiration date for the upgrade, storage used, and a number of account management options. These options are listed at right, under the Actions column.

A. Access the Billing Management interface to track subscriptions & payments history. You can also manually Start & Extend Subscriptions or, add Custom Charges & Store Credit to managed subscriptions through the Authorize.Net gateway.

To manage your paid accounts:
1. Set the ALL package to enable a full-featured subscription that will never expire.
2. Or, set a Custom Package to enable customized product offerings, tailored to specific customer segments.
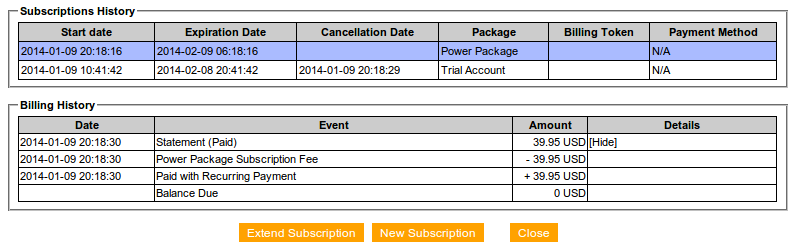
You can Manually Start and Extend Subscriptions using these action buttons:
Select the Package and Start Date.

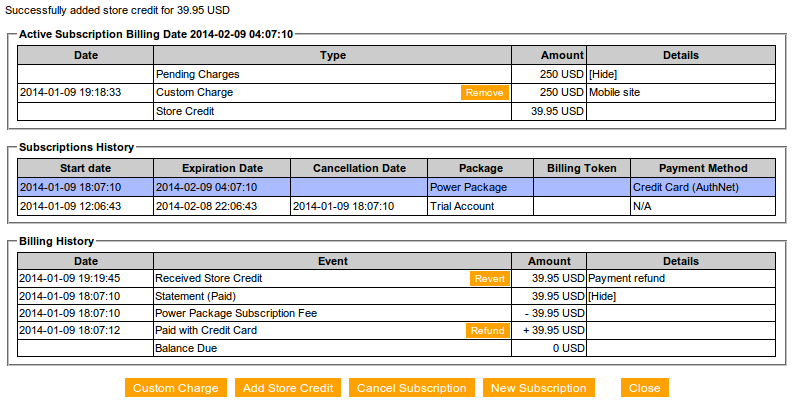
Set the Expiration Date. Each time you click this option, the subscription will Extend according to the package Expiration date. You can add Custom Charges, Store Credit or Refund payments to managed subscription through the Authorize.Net gateway using these action buttons:
the Custom Charge will be automatically deducted from the user's Credit Card on file on the billing date of their subscription. Custom Charges can be Removed if not yet paid.
the Store Credit will be used on the next billing date to cover any pending charges. If there is no store credit, the Credit Card of the user will be billed. Store Credit can be Reverted if not yet used.
you can choose to refund a partial of full payment directly to the user's Credit Credit on file.


B. User Details. Here you may apply the following changes:

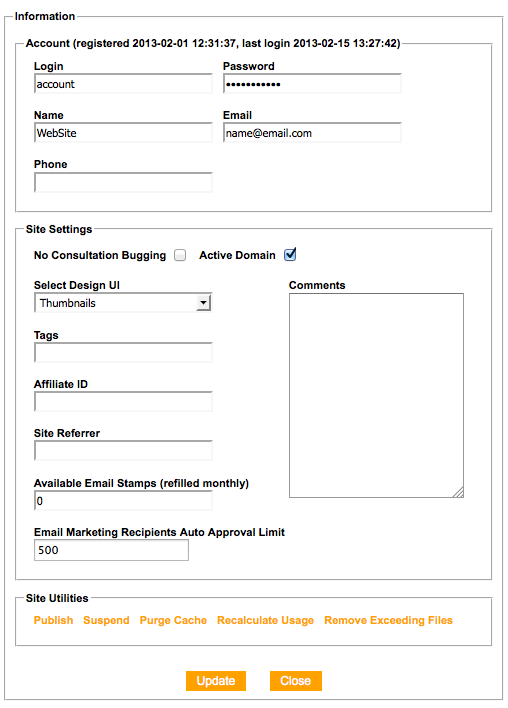
1. Update account information: You may edit the login name, reset the password, update the site name or email. If you have additional field for phone in your sign up wizard, you can view the data in the Phone field.
2. Design changes: in the Select Design UI dropdown menu you can select: dropdown (classic) is the old switch design interface represented by dropdowns, Thumbnails is the latest design switch interface. If you wish to restrict the design usage to the currently selected design only, choose Disabled and your customer would not be able to access the design switch interface.
3. Active Domain: manually control, on an account-by-account basis, whether custom domains are supported.
4. Comments, referrers, tags: in the bottom section of the popup you may enter internal notes in the Comments box, may see the referrer URL for this account, as well as the paid tag (if tags have been enabled for your trial accounts). The option No consultation bugging is only applicable for resellers who signed up for the Professional setup option and have trial followup campaigns launched.
5. With the Site Utilities you may perform a number of actions, such as publishing and *suspending, or recalculating the storage of an account. If you suspend an account, you limit the access to the admin of the site. Each attempt to log into the site admin will take the site owner to a page you specified (this might be a page explaining why the access to the site was banned). You may clean the account's cache and remove any files that exceed the site storage.
*NOTE: Suspended accounts still incur fees when assigned to a billable package.
The options for publishing the site and purging the cache are used just for very specific operations. Please, do not use them unless explicitly instructed by WebForce representatives.
C. Enter Site. Clicking this icon will log you in the Admin of this site. Have in mind you will be logged out from the Admin of your reseller portal.
D. Delete Site. Whenever a site is deleted, an email is automatically sent to the reseller to stop the billing on it.
E. Duplicate Site. Automatically duplicate a site at the click of a button. The copy site will have the same information as the original account, only adding "_copy" to the login name.
After the site duplication is complete, you can update the account information through the User Details area.


Accounts Search Area
The search area above the list of accounts will help you find all accounts matching specific search criteria: subscription ID, name, login, creation or expiration date, etc. Click Show Options link to open Advanced Search view.Search Boxes
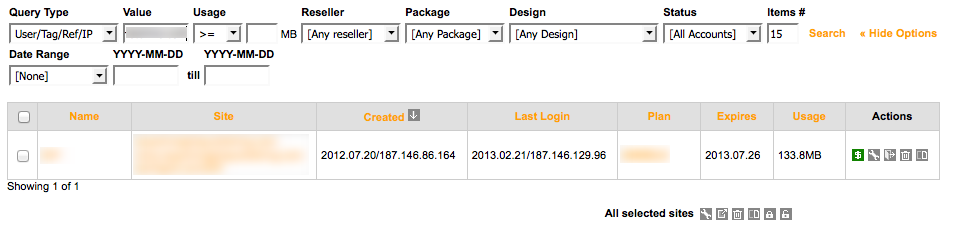
The Query Type and Value boxes will let you search in the user name, email, login, subscription number, domain, IP, UserID, comment
Usage box will search for all sites matching, or above / below a specified storage usage
Package and Design will list respectively the accounts utilizing a specific package or design
Accounts dropdown box will let you filter by non-held, held accounts or test drive accounts
Under "Show Options" you will be able to search for accounts by last login or creation date.