Once you have added client-editable page images to your design, you can provide your client with a library of hand-picked page images they can choose from. This is very helpful considering that most business clients does not know how to use Photoshop to crop an image and optimize it for web delivery.
A single page image library can include images in many different size images, but only the images that match the size specified in the Layout Editor for the current page layout will be visible in the Page Image properties panel (screenshot below)
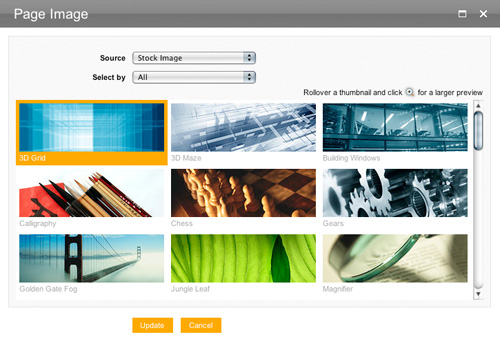
Design Pro comes with a library of professionally selected and cropped images in several sizes. If you can build your design so that the page image container can accommodate one of those sizes -- you can use this stock library for your design. Or you can build your own library with your desired size and set it up to use any set of images that serve your needs.
Using the built-in Stock Image Library
The stock page image library that comes with Design Pro contains images in several sizes:
990x200
920x210
730x230
660x300 (masked images, see Polaris design as an example)
If your design can use one of those sizes, you can set it up to use the stock library in two easy steps:
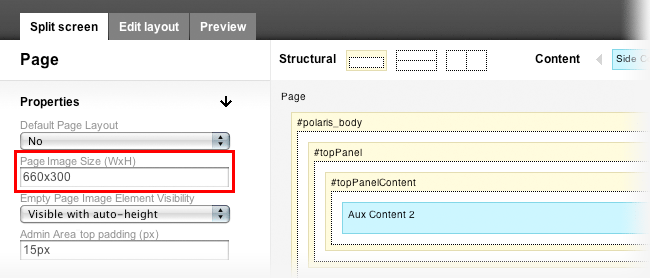
1. Open the Layout Editor and select the Page element (the white area outside the main container). In the Properties panel at left, find the Page Image Size (WxH) field and enter the width and height identifier of the images you would like to use in the following manner: 660x300 (see a screenshot with the size filled-in below), when done, save your layout.
2. Download the stock image configuration file from here.
and copy / paste its contents in to Page Images JSON field (see the bottom of this document how to access it) in Site Properties and press Update to apply the changes to the web site.
Please note that actual size of the images may be different from the size of the container, where this image will reside. You can have a smaller container, e.g. 700x200 pixels and still use the 730x230 stock images, with a few pixels of the image cropped. Alternatively you can have a larger page image container with a background color and a smaller image inside it if necessary.
Setup your own Page Image Library
If you would like to set up a custom page images library, you first have to upload the page images and their thumbnails inside a file area on a page of your site. The page images can be any size that serve your needs, while the thumbnails have to be exactly 210x70 pixels. After you upload all the image files, collect the permalinks for each one of them. Once you have the perma-links for the files collected and the page with the file area is published, you can create the configuration for your custom library. The configuration is in JSON format, which you can be editing with any text editor.
For each image in your library, you will have to have the following code snippet:
{
"id": 0,
"name": "Image-Name-Here",
"preview": "http://small-preview-permanent-link",
"images": [
{
"size": "990x200",
"url": "http://full-image-size-permanent-link"
}
],
"categories": [ "All" ],
"subjects": [ "All" ],
"colors": [ "All" ]
}
Here is what each line means
ID is unique identifier for the image, you can start from 0 and increase the number by 1 for each next image
Name is the name of the image that will be visible in the Page Image Properties dialogue below the thumbnail preview
Preview is the permalink to the thumbnail preview of the image
Size is the size of the image and it should match the size specified inside the "Page Image Size" field in the Page element properties in the Layout Editor.
URL is the permalink to the actual full size image that will be shown on the page if selected
Categories, Subjects and Colors are optional fields where you can specify optional filter criteria. Inside each field you can specify a comma-delimited list of business categories, subjects or colors like: "categories": [ "Technology", "Industrial" ]
When you add a few images, the page image configuration will look like this:
[
{
"id": 0,
"name": "3D Grid",
"preview": "http://domain.com/Tools/file_direct_link.html?node_id=333219237",
"images": [
{
"size": "990x200",
"url": "http://domain.com/Tools/file_direct_link.html?node_id=333219240"
}
],
"categories": [
"Technology"
],
"subjects": [
"Abstract"
],
"colors": [
"Blue",
"Navy"
]
},
{
"id": 1,
"name": "3D Maze",
"preview": "http://domain.com/Tools/file_direct_link.html?node_id=333219238",
"images": [
{
"size": "990x200",
"url": "http://domain.com/Tools/file_direct_link.html?node_id=333219241"
}
],
"categories": [
"Technology"
],
"subjects": [
"Abstract"
],
"colors": [
"Blue",
"Navy"
]
},
{
"id": 2,
"name": "Building Windows",
"preview": "http://domain.com/Tools/file_direct_link.html?node_id=333219239",
"images": [
{
"size": "990x200",
"url": "http://domain.com/Tools/file_direct_link.html?node_id=333219242"
}
],
"categories": [
"Community"
],
"subjects": [
"Buildings"
],
"colors": [
"Blue",
"Navy"
]
}
]
Note that after each image snippet ends, there is a comma before the next one begins like this },
The exception is the last one where it simply ends as }
The entire configuration is enclosed by square brackets [ ]
To verify the validity of your JSON, you can use the following free online tool - http://www.jsonlint.com
Accessing the Page Images JSON field
1. open Site Properties for your DesignPro Editor enabled account
2. to the right of the three buttons (Style Editor, Layout Editor, Preload Stock Design) there is a hidden button - it may help selecting all (CTRL + A in Windows or Command + A on a Mac) to see it highlighted like in the screenshot below3. when clicked, three text boxes will appear, the third being the Page Images JSON text area where you need to paste your page images configuration (stock or custom)
4. after pasting, Update Site Properties to apply the changes on the site
